Showing posts with label lookbook. Show all posts

Monday, 5 November 2012

Bold Lips: Glamourous Red!

Hello lovelies!
It's been a while since I've done a bold lip blog post so I thought I'd get one in.
Plus as we get closer to the holidays, I figure I'd do a glamourous red lip that you could totally rock at the Christmas/holiday parties this year. I love deeper berry tones lip around this time of year. It's just so festive.


Meet my new favourite red lipstick. "Refined Ruby" (#337) from L'oreal's Infallible collection.
It's really gorgeous and rich not to mention because it's from the Infallible line, it's really long-wearing which is great. It's such a hassle when you wear a bright colour that comes off easily because you have to maintain it all day. This didn't give me any trouble at all and most of the time at the end of the day I have to use a makeup wipe to get it off.


It's a really smooth texture and doesn't drag at all. It almost stains your lips, making it really long-wearing and low maintenance. 


The colour can really make your look much more complete. I'm wearing very little eye makeup in these pictures and the lipstick is enough to really make an impression. Which makes it perfect for a busy holiday season when you want to look pretty and festive without a ton of work.


Anyway, I love this lipstick and I highly reccomend anyone looking for a glamourous/pin-up red try this one out and best of all it's a drugstore brand so it's very affordable. Let me know with a tweet (@TashaSinghxx) or a comment if you like it! 


 Just a Few Things...
  •  I am nervous to take my grad photos Thursday, but more so I can't believe I'm actually taking grad photos. Where did the last three years of university go?!!?
  • Pet peeve: I really hate people who complain and whine about Christmas music/commercials/decorations being used way too early. Just stop being so grinchy and enjoy the holiday season with your loved ones. 
  • On a much better, cheerier note- the Starbucks Christmas drinks are back! Every year I indulge in the delicious, Christmasy delight of Gingerbread lattes (made with tea because I don't drink coffee). They are so so so so addictive! I think I might try the Peppermint Hot Chocolate or the Caramel Brulee this year too. :)
  • School stress is killing me. I say that every year. But this year really is particularly bad.
  • Got the new Galaxy SIII and I really enjoy it. Makes one hand texting hard. 

Thanks for reading!
-Tash<3

Thursday, 26 April 2012

Avengers Series: The Incredible Hulk

Admittedly, this is a super nerdy thing to do but I'm going to do it anyway.
So begins the series of eye looks using colours from all the different members of the Avengers!
I started with Hulk because he's the easiest (only 2 colours) and I have to work out the problem of not having any red eyeshadow for Captain America or Iron Man.
Credit for this idea totally goes to this picture I found on the best time waster website in the whole world:
themetapicture.com


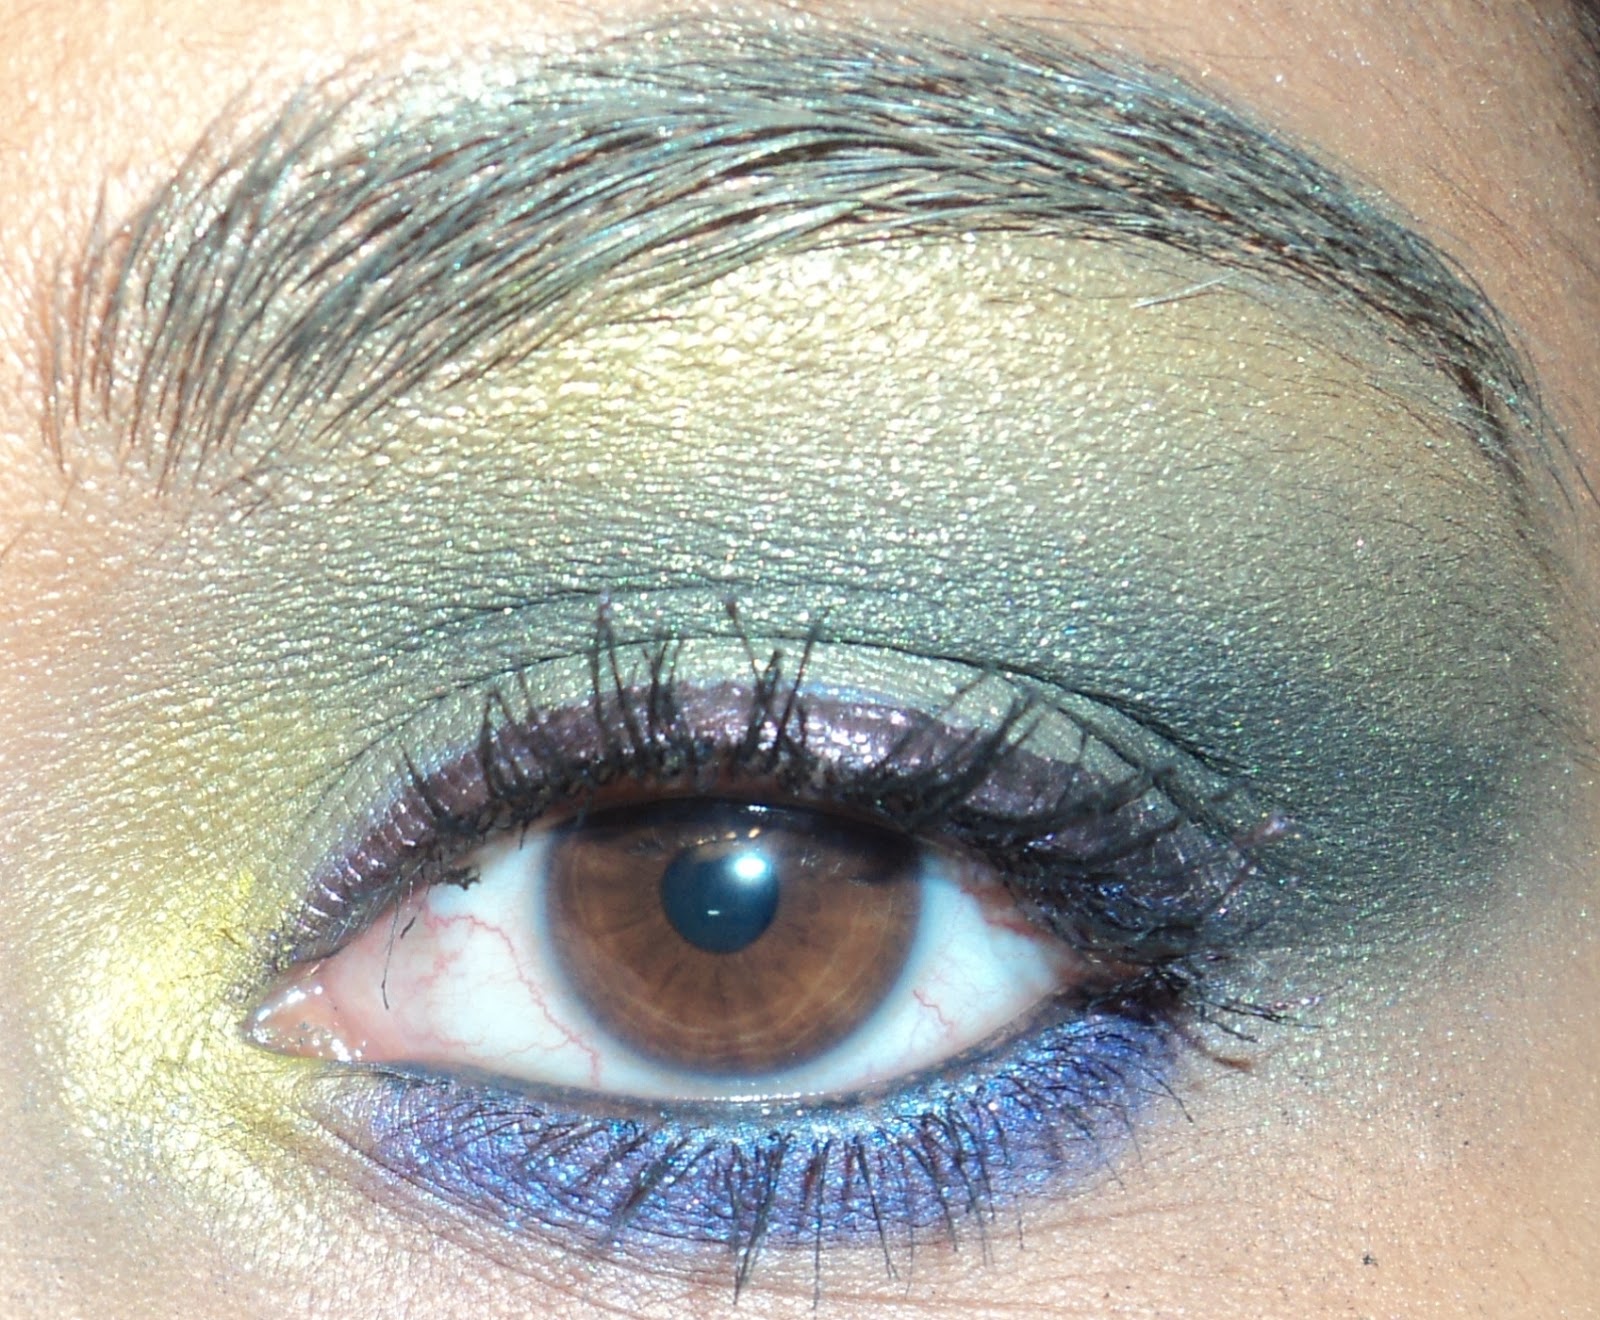
Obviously there's the green, so I graduated from a sort of emerald green on my lid to a darker forest green in the crease and blended it out with a lime green towards my browbone. I used a TINY amount of black to darken the outer corner.
Lined my top lid with purple liquid liner. 
I tried to blank out my eyebrows and fill them back in with green. I failed because I was missing something important. But I will get it for the next look and have a little "How to" section about blanking out your eyebrows. 


I put some of the same lime green in my inner corner to brighten it up a little. Then I just curled my lashes and added mascara. 


My lower liner looks blue in the pictures but I promise it's purple in person. I used "Ransom" 24/7 eyeliner by Urban Decay and topped it off with a purple shadow. I rimmed my waterline and tightline with a black liner and added mascara to my bottom lashes. 


And that's the Incredible Hulk from the Avengers in an eye look. Can you tell I'm excited for the movie?
Thanks for reading
-Tash <3

Thursday, 23 February 2012

Lookbook: Colourful Springtime Look

Good lord do I know how to fail at blogging eh?
Oh well. Reading week will yield as many posts as possible and after that, I can't promise anything.
I finally got around to photographing some eye looks that I really love.
This one is quite bold, not really your everyday, "just going grocery shopping look" unless this is what you were to go grocery shopping- in which case, you're awesome.


As the title suggests, I used a lot of springtime, bright fun colours for this look. Skipped the dark eyeliner on my top lid because my eyes are small and it tends to eclipse my makeup when I wear it. I did however tightline my upper waterline and lower waterline with black liner. 
*Tip: Always do that if you're going for a long, thick eyelashes. It instantly makes it look like your lashes are thicker, darker and longer.
Products used:

All the specific eyeshadows used are listed below.

Left: "Robin's Egg" MAC (matte, LE)  I love this colour so much.
Right: "Sharp" MAC, the bottom corner, lime green colour (satin, LE) 

Left: "Blue Had Me At Hello" palette by Wet'n'Wild (the bright teal colour stamped "eyelid")
Right: "Lust" palette by Wet'n'Wild (two dark purples along the left)
*Both of these palettes are drugstore, very affordable and GREAT value. The pigmentation is phenomenal.

I placed a bright yellow shadow (not pictured because I couldn't find it afterwards) in the inner corner of your eye and along the first quarter of my eyelid. I followed that with the lime green colour from MAC and blended the two colours together to prevent a line. Next I added "Robin's Egg" and the teal from the Wet'nWild palette on the middle to the edge of my lid and blended it in the with the green. It's REALLY important to blend every colour you use, especially when you do a colourful look, otherwise lines will be plainly visible.
I created the outer "v" shape with the light and dark purples from the "Lust" palette mixed together. I took those up into the crease of my eye and blended them out. I used the matte cream shade from the same palette as my highlight on my browbone. 
I mirrored the colours in the same places alone my lower lashline to balance out the look.
I skipped the black liner and just used some mascara. If I remember correctly I used Definicils by Lancome.
*Tip: Colourful looks like this tend to produce A LOT of fallout from the eyeshadows. You can see it, on the back of my lashes in the photo above. Be careful and pat eyeshadow on, don't swipe. And if it's really built up on your lashes, run your mascara behind your lashes as well to cover it up.


This is what happens when you try to photograph too many looks for blog posts, all in one day.
You end up looking like Two-Face. Fml.


Hope you guys enjoy this look and try it out!
-Tash <3

Friday, 20 January 2012

Stila Eyeshadow Palette: Review

Sorry about the hiatus people. School is just murdering me already...
So let's not talk about it and get straight into the review shall we?

I recently picked up the new "In the Moment" eyeshadow palette from Stila. I have owned Stila eyeshadows before and they were just "meh" for me. For example, I have the so described "cult classic" eyeshadow in "Kitten" that everyone and their mom is supposed to love. I wasn't loving it. 

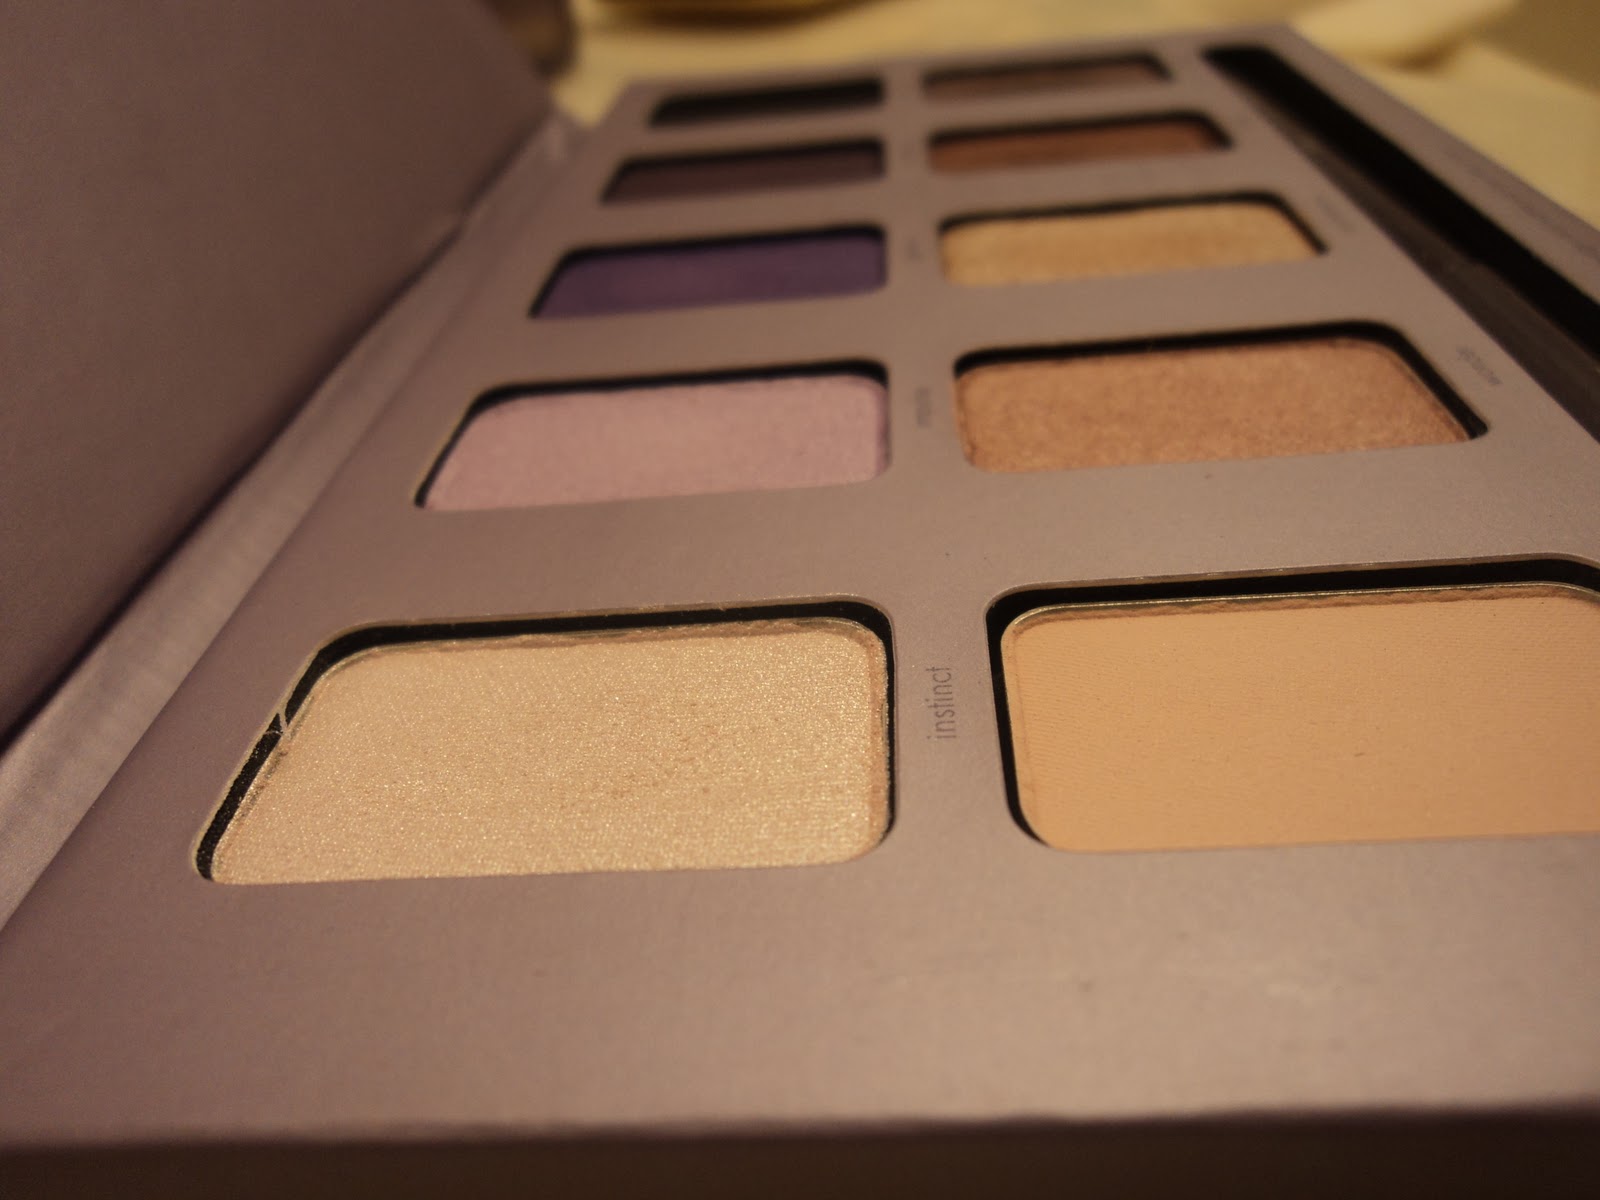
However I couldn't resist this new palette. It's the "In the Moment" palette and it has 10 eyeshadows total, some really great neutral, wearable shades and some really beautiful purples as well. The lid of the palette is magnetic and the case is very sleek and portable. 
The palette is $51 and it's available in stores Sephora or online at Sephora.com.


The shadows are great quality. All are very pigmented and they're very soft, almost creamy textures which makes them great to work with. 
From left to right (top row): Instinct, Impulse, Glance, Improvise, Catalyst
From left to right (bottom row): Desire, Wonder, Spontaneous, Whim, Captivate
I'm not sure if these shades are sold individually or outside this palette but I thought I would include the names just in case.


This palette also comes with a full-sized smudge stick in "Tetra" which is a very beautiful dark plum eyeliner with a light purple shimmer.
I have tried the smudge sticks before in "stingray" (black), "purple tang" (black with purple shimmer) and they are SO worth it. They are creamy, soft and some of the most pigmented liners I have ever tried and they are the automatic, twist-up kind which I love. Seriously, this palette is worth it for the liner alone.


A downside about this palette (if you care about this kinda thing) is that of the 10 shades, only 2 are matte colours- desire (light, pinky beige) and glance (deep purple). I personally don't mind that because the shimmer on some of the other shades is so subtle you barely notice it.


This is the inside cover of the palette. A quick google search tells me that Sarah Lucero is a makeup artist with Stila. 
This palette also comes with a "lookbook" which is a little book that shows you how to create six different eye looks with the palette. I thought it would be interesting to re-create one and see if the look actually turned out any good. Surprisingly, it did. The looks in the book are easy to do and range from subtle everyday looks to darker, smokier looks.


I chose to recreate the first look in the book called "wide eyed wonder" - it's the most wearable, subtle look suggested. I chose it because I was doing this before class one day and didn't want anything to overdone. I tweaked it to my own tastes so it's a little different from what it says in the book.


*Note: try not to judge the eyeshadows based on these photographs. I took them in bad light and only after many hours of wear. The "whim" colour in my crease is actually much darker but it gets washed on in the photos. Sorry!

I applied "wonder" all over my lid and blended "whim" in the crease of my eye.  
I blended out the dark brown colour with a skin tone shade (which would obviously vary for everyone).
I used "desire" lightly as a highlight on my browbone and in my inner corner. 
I also went back with the "wonder" colour but I used MAC Fix+ and used it wet right in the middle of my lid to make the colour stand out.
I used the "tetra" smudgestick that came with the palette for my liner.
I'm not positive but I think was wearing MAC "prep and prime" for lashes with L'oreal Million Lashes on top.

Overall: This palette is amazing quality and while $51 may seem like a lot, it's really a great deal.
10 shades divided by $50? Even a journalist can do that math, that makes each shade only about 5 dollars (not to mention you get a full-sized liner for $1).
If you're new to makeup and want a palette with neutrals that also offers some colourful options- this is a great place to start.
If you're kind of a makeup junkie like me with a huge collection, you don't necessarily need this palette but it is very useful and travel-friendly.  

Hope you enjoyed this post and thanks for reading guys!
-Tash <3